• Banner 1


Course Tour

  • Hole #1

    Hole #1

    A beautifully crafted starting hole to ease you into the round. Steer clear of the left side as a water hazard awaits. This first green is the flattest on the course with plenty of room in front to roll the ball to the pin. Birdies are to be found here, so swing easy and begin under par.
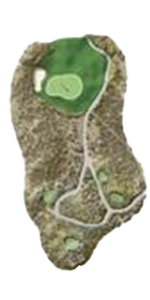
  • Hole #2

    Hole #2

    As this first par 3 begins with an elevated tee, be sure to club down when checking your yardage. This sizeable green is surrounded by both sage and a sloping hill on the backside. A shot landing on the opposite tier of the pin could prove to be a difficult two putt.
  • Hole #3

    Hole #3

    Daunting to the eye and uphill, this par 5 tests your straight shooting skills. Smart golf and patience will be rewarded. Your approach shot into the green needs to be below the hole; be aware of the speed and slope of the putting surface.
  • Hole #4

    Hole #4

    This hole may look straightforward, however the fairway cut is both narrow and short in length. A long drive may place you in the rough near the end of the fairway. Grip it and rip it provided the long rough does not intimidate. Keep the ball below the hole to have a go at birdie.
  • Hole #5

    Hole #5

    For those big hitters, keep the driver in the bag and play to the middle of the fairway. Sagebrush surrounds the fairway and does not provide much room for error. Take at least one extra club for your approach shot into this green that is elevated and slopes from back left to front right.
  • Hole #6

    Hole #6

    Breathe in the beautiful views of Carson City as you step up to the tee box. Take dead aim at any pin center or right on this short par 3. Two bunkers are placed near the front and right side of the green. Sagebrush is immediately to your left.
  • Hole #7

    Hole #7

    Pay attention to the pin placement here as a sloping green could add a few unwanted strokes. The bail-out area for this hole is short of the green. The bunker front left of green is to be avoided at all costs. A hidden bunker is placed off the backside of the green to catch those long or low trajectory shots. The slope on the right side of the green can be your friend.
  • Hole #8

    Hole #8

    Now’s the time to tee it high and let it fly on this open par 4. A wide fairway awaits with plenty of room right for those errant shots. The green is fairly flat allowing for an easy birdie opportunity.
  • Hole #9

    Hole #9

    Let it rip once again with a fade being an ideal ball flight for those long hitters. Aim for the patch of fairway to the left of the right hand bunkers, as this placement will be beneficial for your approach shot. Short left center is the safe lay-up. Smart play can be rewarded with an eagle.
  • Hole #10

    Hole #10

    A straight shot to the barber pole will provide a nice even lie for your shot into the green. A narrow dry riverbed crosses the fairway 70 yards in front of the green; leave the driver in the bag if you are a big hitter. The mound on the front right of the green funnels shots down into the back part of the green from the center.

  • Hole #11

    Hole #11

    A large pond is positioned down the right side of the fairway on this dogleg right par 4. The putting surface is fairly flat and long with 3 bunkers situated on both sides. Aim for the barber pole off the tee box, with a fade, and then make a straight shot into the green.
  • Hole #12

    Hole #12

    This straight away par 3’s most noticeable feature is the green. The stretched green has a valley dissecting it in half from front to back. The front tier of the green is higher than the back. Do your best to play to the correct tier as a long putt is very challenging here.
  • Hole #13

    Hole #13

    The signature and number one handicap hole for men plays as a long par 4 reachable in two, however very difficult to hold the green with a long iron shot. Let it rip off the tee and then choose wisely for the next shot as a large pond splits the green and the fairway. Laying up here may be a wise choice. The wind can make club selection challenging to this shallow green.
  • Hole #14

    Hole #14

    From the tee boxes on this par 3 you will find yourself hitting up to an elevated green. Consider your option of hitting to the front left and rolling the ball up to the pin as this green can be hard to hold. Short right funnels down into the swale.
  • Hole #15

    Hole #15

    Hole # 15 is a well guarded par 5. Play the ball to the center of the fairway, avoiding the lake on the right side and prepare for your second shot in. Big hitters can go for the green from here; however a skinny dry creek bed is positioned 50 yards before the putting surface along with a large lake surrounding the left and back. If in doubt, lay up before the creek bed to play it safe. The green is small and undulating.
  • Hole #16

    Hole #16

    Straight away and short, this par 4 allows for another birdie chance. Six sand bunkers line the fairway from 125 yards in. The putting green is big and fairly flat with much room surrounding it.
  • Hole #17

    Hole #17

    Aim to the barber pole in the center of the fairway or even right of it as the fairway opens up a bit more for the bigger hitters. The green is two tiered and slopes down from back to front and tapers greatly in the front. Pay attention to the location of the flag as it may affect your approach shot club selection.
  • Hole #18

    Hole #18

    Our finishing hole allows for a big drive off the tee as the fairway is long and wide. The putting green is surrounded by water, so be aware that “going for it” may not be your best option. The lake begins on the left at 110 yards from the green, so if you do choose to lay up aim right as the fairway extends 40 more yards from there.

Handicap Tables

Men's Tables By TeeWomen's Tables By Tee
Black Tee White Tee
Blue Tee Yellow Tee
White Tee Red Tee
Yellow Tee  
Close